Tangaza University Systems
- Navigating the Student Portal
- Signing In to Your Tangaza School Email
- Student Information Guides
- Navigating the Learning Management System (Moodle)
- Navigating the Library Catalogue – OPAC
- Navigating the E-Library – MyLOFT
- Navigating the Digital Repository
- Library Services & E-Resources
Navigating the Student Portal
This guide walks through how to use the Tangaza University Student Portal at student.tangaza.ac.ke, step by step for each menu item.
Use the coloured sections below to jump straight to what you need: Getting Started, Academics, Financials, Examination, and Account & Profile.
Getting Started
1. Logging In
- Go to student.tangaza.ac.ke.
- Enter your Registration Number in the "Registration Number" field.
- Enter your Password in the "Password" field.
- Click "Login." Alternatively, click "Continue with Your School Email" to sign in with your institutional Google account.
2. Resetting a Forgotten Password
- On the login page, click "Forgot Password?"
- On the Reset Password screen, enter your registration (admission) number in the "Reg. Number" field.
- Click "Reset Password."
- Check your official Tangaza University email for a reset link and follow it to set a new password.
- Click "Login" on that screen if you remember your password and want to go back instead.
3. Dashboard
- After logging in, you land automatically on the Dashboard.
- Check the top notice for your exam eligibility status and what's outstanding (unit registration, fee clearance, passport photo, lecturer evaluation).
- Review the summary cards for registered/attempted units and your fee balance.
- Scroll down to view your personal information and any "Important Documents" posted by the university.
Academics
4. Course Registration (Viewing History)
- Click "Course Registration" in the Academics menu.
- In the history table at the top, find the semester you want to review.
- Click "View Units" on that row to see the units registered for that stage/semester.
5. Registering Units for the Current Semester
- On the Course Registration page, scroll to the "Units Registration" panel.
- Confirm the "Registration Semester" field shows the correct current semester.
- Choose a "Registration Type" from the dropdown:
- Nominal Role (standard) – for students attempting the course for the first time.
- Supplementary – for students redoing an exam.
- Retake – for students redoing the unit for the whole semester.
- Click "Get Units to Register" to open the core unit's popup.
- Tick the checkboxes next to the units you want, then click "Add Selected Units to the Basket."
- If you have elective units, click "Get Elective Units to Register" instead, tick your chosen electives, and click "Add Selected Units to the Basket."
- Review everything in the "Basket Unit List" table; remove any unit you don't want using its Action button.
- Click "View Proforma Invoice" to preview the fee impact of your selected units.
- Click "Complete Registration" to finalize and submit your registration.
- Click "Print Course Statement" afterward if you need a printed record.
6. Timetable
- Click "Timetable" in the Academics menu.
- View your registered units with class group, day, time, room, building, and lecturer.
7. Academic Requisitions
- Click "Academic Requisitions" in the Academics menu.
- Click "New Requisition" to start a request.
- Fill in the requisition type and details as prompted.
- Click "Send Approval Request" to submit it.
- Track its status in the requisition list table; use "Cancel Approval Request" if you need to withdraw it, or "View Approval Status" to check progress.
8. Lecturers Evaluation
- Click "Lecturers Evaluation" in the Academics menu.
- Find the unit you want to evaluate in the list.
- Click "Evaluate" next to that unit.
- Complete the evaluation form and submit it.
- Repeat for each registered unit listed.
9. Graduation Request
- Click "Graduation Request" in the Academics menu.
- If you're on the official graduating list, follow the prompts to submit your request.
- If you see an error saying you're not on the graduating list, this means you're not yet eligible and should contact the registrar.
10. Clearance Request
- Click "Clearance Request" in the Academics menu.
- Review your pre-filled details on the Clearance Form.
- Click "Make Request" to submit your clearance request.
11. Moodle, MyLoft, and View Student Resources
- Click "Moodle" to open the university's learning management system in a new tab.
- Click "MyLoft" to open the library platform login.
- Click "View Student Resources" to open the general student resources page on the main Tangaza website.
Financials
12. Fee Statement
- Click "Fee Statement" in the Financials menu.
- Review the ledger of debits and credits (charges and payments).
- Click "Print Fee Statement" to generate a printable copy.
13. Receipts
- Click "Receipts" in the Financials menu.
- Find the payment you want in the list (by receipt number, date, or amount).
- Click "Print Receipt" next to that entry.
14. Payment Plan
- Click "Payment Plan" in the Financials menu.
- Click "Create Instalment Plan."
- Follow the prompts to set up your instalment schedule.
Examination
15. Exam Card
- Click "Exam Card" in the Examination menu.
- Wait for the PDF to generate, showing your photo, registration details, programme, and the units you're cleared to sit.
- Use the print icon in the viewer toolbar to print it, or the download icon to save it.
16. Special Exam Card
- Click "Special Exam Card" in the Examination menu.
- This generates a similar authorization card for supplementary or special exam sittings; print or download it the same way as the regular Exam Card.
17. Semester Result Slip
- Click "Semester Result Slip" in the Examination menu.
- Review the generated PDF showing course codes, titles, credit hours, and grades for a specific semester.
- Print or download it using the toolbar icons.
18. Provisional Results (Provisional Transcript)
- Click "Provisional Results" in the Examination menu.
- Review the generated "Provisional Transcript" PDF, which lists course codes, titles, credits, and grades across all completed semesters to date.
- Print or download it using the toolbar icons. Note that this is unofficial/provisional and not a certified transcript.
Account & Profile
19. Account Settings
- Click your name in the top-right corner to open the profile menu.
- Click "Dashboard" to return to the home screen.
- Click "Change Password" to update your login password.
- Click "Logout" to securely end your session when finished.
Signing In to Your Tangaza School Email
Temporary password: August@2025. Google will force you to change it the moment you sign in - have a new password ready (at least 12 characters, with upper case, lower case, a number and a symbol).
Your address is your admission number with the slashes removed, plus @tangaza.ac.ke. For example, admission number ys72/00137/2025 becomes ys72001372025@tangaza.ac.ke that is only an example, so use your own admission number.
Part A - On your Phone (Gmail app)
Part A - On your Phone (Gmail app)
- Open Gmail. On a phone with no account, tap Add an email address. If you already use a personal Gmail, tap your profile picture, then add another account.
- Choose Google. Not Exchange, not Other your school account is a Google Workspace account.
- Enter your full address and tap Next. No slashes, no spaces, no capital letters.
- Type the temporary password August@2025. Tick Show password to check for typing mistakes, then tap Next.
- Tap I agree on the Terms of Service page. You only see this the first time.
- Set your own password. Google requires this on first sign-in: at least 12 characters with upper case, lower case, a number and a symbol. Do not reuse the temporary one.
- Your inbox opens. Drive, Docs and Classroom now use the same account. Switch accounts from your profile picture and check the address at the top before sending mail.
Turn on 2-Step Verification (do this now, on your phone)
This stops anyone signing in as you even if they learn your password. It takes about two minutes, and it is required — if you do not do it here, Google will make you do it the first time you sign in on a computer.
- In the Gmail app, tap your profile picture at the top right.
- Tap Manage your Google Account. Check the address on the screen is your @tangaza.ac.ke one, not a personal Gmail.
- Tap Security. If you cannot see it, swipe the row of menu words sideways.
- Scroll to How you sign in to Google and tap 2-Step Verification.
- Tap Get started. Type your password again if Google asks.
- Enter your own mobile number first. Type it in full and check it before continuing: +254 7XX XXX XXX. It must be your number, on a phone you keep — never a friend's or a relative's.
- Choose Text message, then tap Next and type the 6-digit code Google sends you.
- If Google also offers Google prompts — a "Yes, it's me" message on this phone — accept that too.
- Tap Turn on.
Now get your backup codes — do not skip this
- On the same 2-Step Verification screen, scroll down and tap Backup codes.
- Tap Get backup codes.
- You will see ten 8-digit codes. Screenshot them or write them down and keep them somewhere safe that is not your phone.
Each code works once. They are how you get into your account if your phone is lost, stolen, or has no network.
If your data is often off: also add Google Authenticator from the same screen. It makes codes without any internet or airtime, which is the most reliable option on a phone with patchy data.
Never read a verification code to anyone. Not to a classmate, not to someone claiming to be from ICT, not to anyone on the phone. The University will never ask you for a code.
Part B - On your Laptop/Desktop
Part B - On your Laptop/Desktop
- Go to https://mail.google.com/a/tangaza.ac.ke. If someone else's account is showing, click the profile picture and choose Sign out or add another account.
- Enter your address and password, clicking Next after each.
- Google will prompt you to change your password immediately after this first sign-in. Set a new password following the same rules as above (at least 12 characters with upper case, lower case, a number and a symbol) and do not reuse the temporary one.
- On a shared or library computer, always click Sign out when you finish, and never save the password.
Turn on 2-Step Verification — you must do this the first time you sign in on a computer
Google will ask you to set this up as soon as you sign in. Do it there and then. If you see Try later, Not now or Skip, do not click it. You will only be asked again, and until you finish it you can be shut out of your email, Moodle and everything else that uses this account.
Have your phone in your hand before you start. The whole thing takes about two minutes.
- Sign in at gmail.com with your @tangaza.ac.ke address.
- When the 2-Step Verification screen appears, click Get started or Continue. Type your password again if Google asks.
- Enter your own mobile number first. Type it in full and check it before continuing: +254 7XX XXX XXX.
- Choose Text message, then click Next.
- Google sends a 6-digit code by SMS. Type the code in and click Next.
- Click Turn on.
It must be your own number, on a phone you keep. Not a friend's, not a relative's, not the cyber café attendant's, not a number you are about to stop using. Whoever receives the codes controls the account — they can get in, and they can lock you out.
Check the digits twice before you click Next. If one digit is wrong the code goes to a stranger, and you cannot finish signing in.
Save your backup codes
- Back on the 2-Step Verification page, find Backup codes.
- Click Get backup codes, then download or print them.
- Keep them somewhere safe. Do not save them only on the computer you signed in from, and never on a shared or cyber café machine.
Each code works once. They are how you get back in if you lose your phone or change your number.
Changing your phone or SIM soon? Get your backup codes, or add Google Authenticator, before you make the change. Students who set up only SMS and then change number are the ones who end up locked out.
On a shared or cyber café computer: always click your profile picture and Sign out when you finish, then close the browser. Signing in is not the risky part — walking away still signed in is.
If Something Goes Wrong
If Something Goes Wrong
| Problem | What to do |
|---|---|
| "Couldn't find your Google Account" | The address is mistyped. Check the slashes are removed and the ending is exactly `@tangaza.ac.ke`. |
| "Wrong password" | Tick Show password and retype it. Note that passwords are case sensitive. Use Forgot password? or ask ICT for a reset. [ICT Support Link](https://ictsupport.tangaza.ac.ke) |
| Can't receive the verification code | Tap Try another way option or ask ICT to reset your second step. |
| Account disabled or suspended | Visit the ICT Office or raise a ticket on the [ICT Support Link](https://ictsupport.tangaza.ac.ke) |
Need help? Visit the ICT Helpdesk during office hours with your student ID.
Student Information Guides
Welcome to the Tangaza University Systems Help Center
New here? Start with whichever guide matches what you need right now. You can always come back for the other one.
🎓 Navigating the Student Portal
A complete walkthrough of the student portal at student.tangaza.ac.ke, covering:
- Logging in and resetting your password
- Registering your units each semester
- Checking your fee statement and receipts
- Printing your exam card and result slips
✉️ Signing In to Your Tangaza School Email
Step-by-step instructions for your official @tangaza.ac.ke Google account, covering:
- Signing in for the first time, on your phone or a computer
- Setting a new password on first login
- Securing your account with 2-Step Verification
- What to do if something goes wrong
🖥️ Navigating the Learning Management System (Moodle)
How to find and join your units on the LMS at lms.tangaza.ac.ke, covering:
- Signing in with your Tangaza Google account
- Finding your unit by search or by browsing
- Joining a unit, with or without an enrolment key
- Checking your units under My courses
📚 Library Services & E-Resources
Find library materials and access e-resources through the Catalogue (OPAC), the E-Library (MyLOFT) and the Digital Repository, covering:
- Searching the Library Catalogue (OPAC) for books and journals
- Using the E-Library (MyLOFT) for e-books, e-journals and databases
- Finding University publications in the Digital Repository
Navigating the Learning Management System (Moodle)
Every unit you take has its own page on the Learning Management System (LMS). That is where your lecturer puts notes, slides, reading, assignments and marks. Before you can see any of it, you must join the unit. This guide shows you how – it takes about two minutes per unit.
Part 1 · Getting into your units
Before you start
- Your university Google account – the same one you use for your student email for example (ys72001372025@tangaza.ac.ke). The LMS has no separate password.
- The unit code or unit name – for example ISTP 701, or Foundations of Peacebuilding. Your timetable has these.
- An enrolment key – but only for some units. Your lecturer gives you this in class. Not every unit needs one.
Step 1 · Sign in
The LMS uses your Tangaza Google account. There is no separate LMS username or password to remember.
- Open your browser and go to lms.tangaza.ac.ke.
- Click the Continue with School Email button. It is the only way in.

- Choose your Tangaza account from the list, or type your university email address and password if Google asks for them.
- The first time only, Google may ask you to allow the LMS to see your name and email. Click Allow.

Step 2 · Find your unit
There are two ways. Either works.
The quick way – search
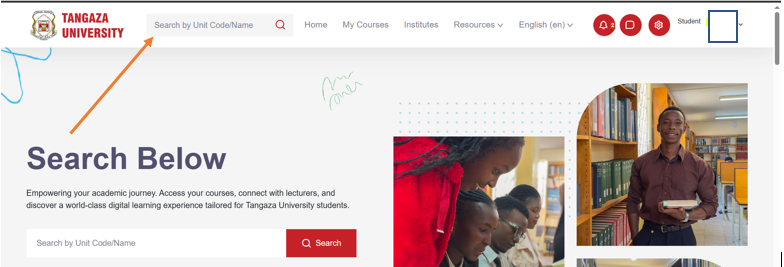
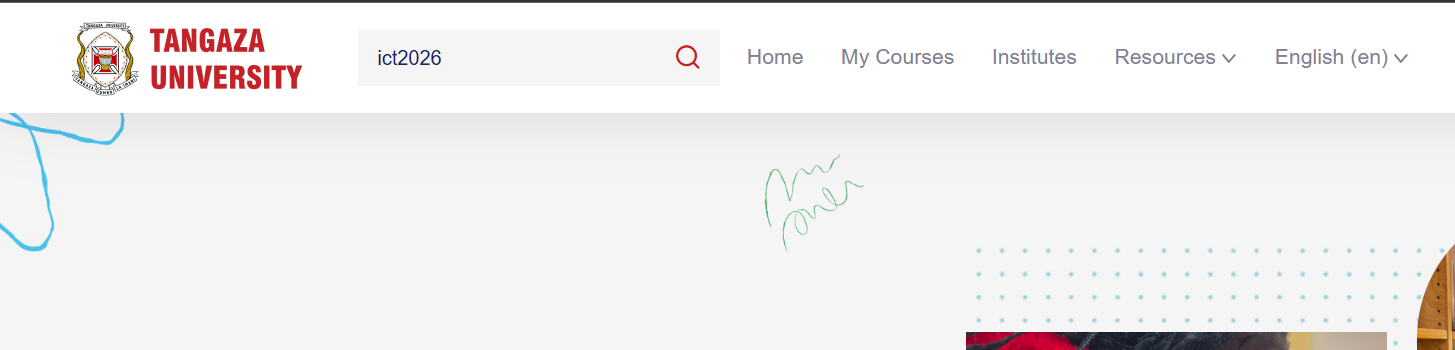
- Click the search box at the top of the page.

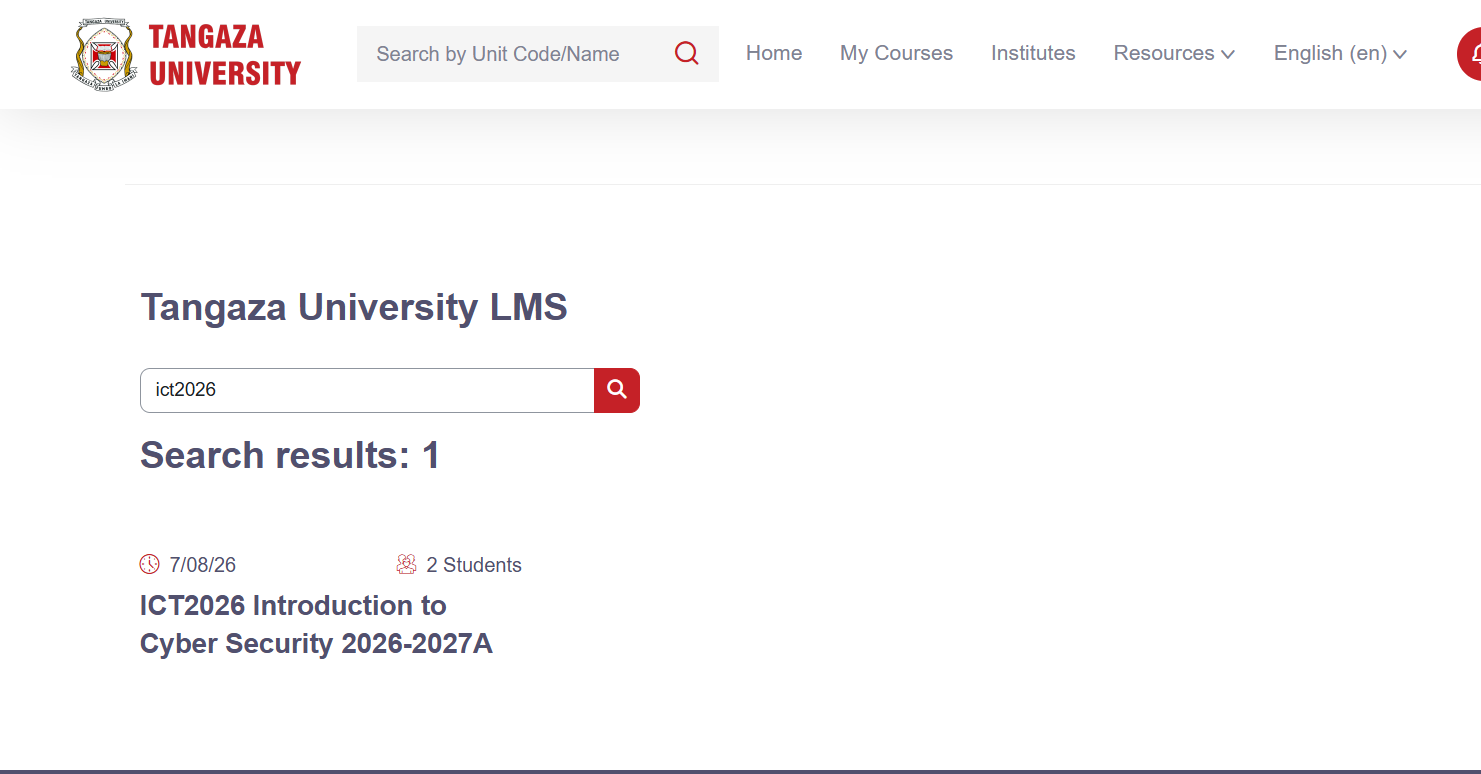
- Type the unit code or part of the unit name given to you by the lecturer or the Institute administrator. E.g. ICT2026.

- Press the search icon and click the correct unit in the results.

Step 3 · Join the unit
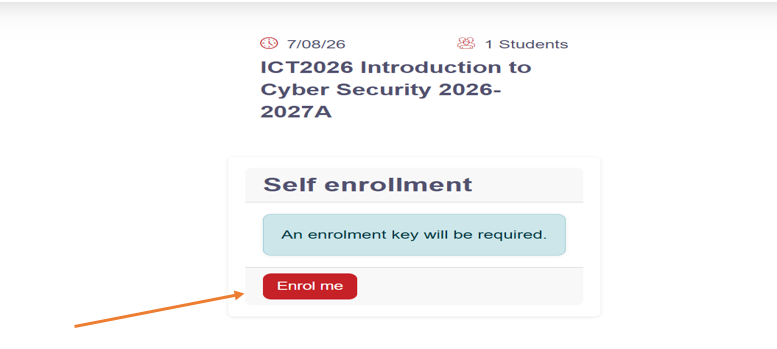
When you open a unit you have not yet joined, the LMS shows you an enrolment panel. It looks like one of two ways.
A. There is only a button
- Click Enrol me.

- That is all – you are taken straight into the unit.
B. There is a box asking for an enrolment key
- Type the enrolment key supplied by your Institute administrator.

- Click Enrol me.
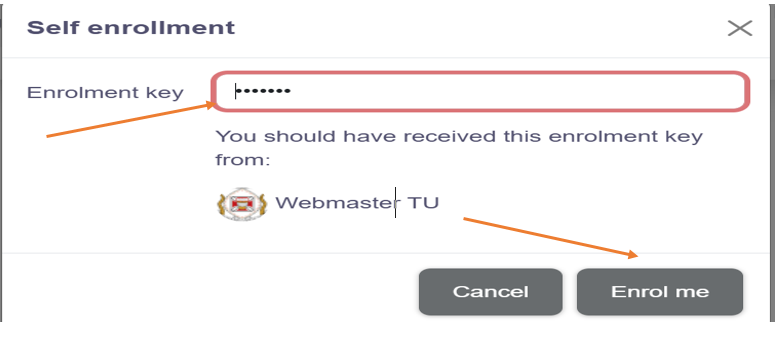
Three things about keys:
- Capital letters matter. Isaac and isaac are not the same key.
- Watch for trailing spaces. If you copied the key from a message, make sure you did not copy a space at the end. This is the most common reason a key is refused.
- You only type it once. It is not a password, and you will not be asked for it again.
Step 4 · Check that it worked
- Click My courses in the main menu.
- Every unit you have joined is listed there.
- If a unit is missing, you did not finish joining it. Go back to Step 2 and try again.
You only join a unit once. From then on, it stays under My courses for the rest of the semester, and you go straight in with one click.
If something goes wrong
| What you see | What to do |
|---|---|
| There is no Enrol me button on the unit page | Your lecturer has not opened enrolment yet. Ask them, not ICT. |
| My key is not accepted | Type it by hand rather than pasting. Check capitals. If it still fails, ask your lecturer whether the key has changed. |
| “This course is currently unavailable to students” | The unit is still being prepared. Ask your lecturer when it will open. |
| I cannot find the unit anywhere | Check you are looking in the right academic year. If it is still missing, ask your lecturer for the direct link. |
| I joined the wrong unit | Open the unit, go to the unit menu and look for Unenrol me. If you cannot see it, ask your lecturer to remove you. |
| I signed in but My courses are empty and everything looks new | You are probably signed in with a personal Gmail. Sign out fully, then sign in again with your university address. |
| Google will not let me in at all | This one is for ICT, not your lecturer. |
Who to ask
| Your question | Ask |
|---|---|
| The enrolment key for a unit | Your lecturer |
| When a unit will be opened | Your lecturer |
| Assignments, marks and deadlines | Your lecturer |
| Google sign-in problems, password resets, account locked | ICT Service Desk – [ICT Help Desk Link](https://ictsupport.tangaza.ac.k) |
| Signed in with the wrong account | ICT Service Desk – [ICT Help Desk Link](https://ictsupport.tangaza.ac.k) |
| The site is down or very slow | ICT Service Desk – [ICT Help Desk Link](https://ictsupport.tangaza.ac.k) |
Part 2 · Assignments
Assignments are submitted online, inside the unit. This section shows you how to find an assignment, upload your file, and most importantly make sure it is actually handed in.
Finding the assignment
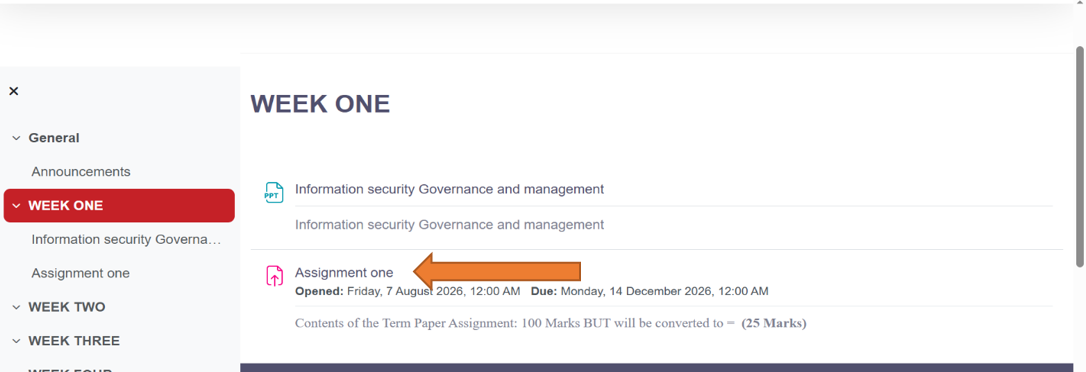
- Open the unit and go to the week or topic where the lecturer placed the assignment.

- Click the assignment. You will recognise it by the assignment (handwriting) icon. This opens the assignment page, which shows the instructions, the due date, and your submission status.
- If the lecturer attached a brief or question sheet, click it to download it. Read it carefully and be sure you understand what is required before you start.
Submitting the assignment
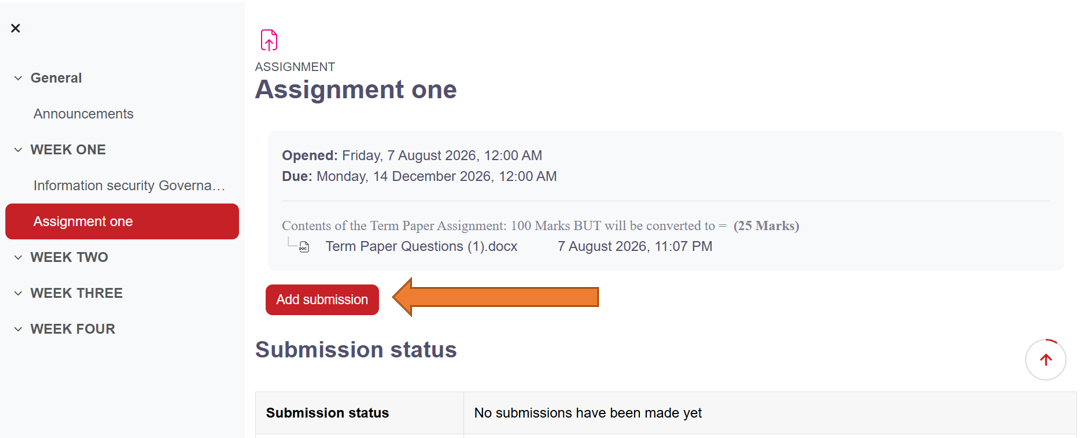
- On the assignment page, scroll to the submission status and click Add submission. Keep an eye on the due date shown near the top.

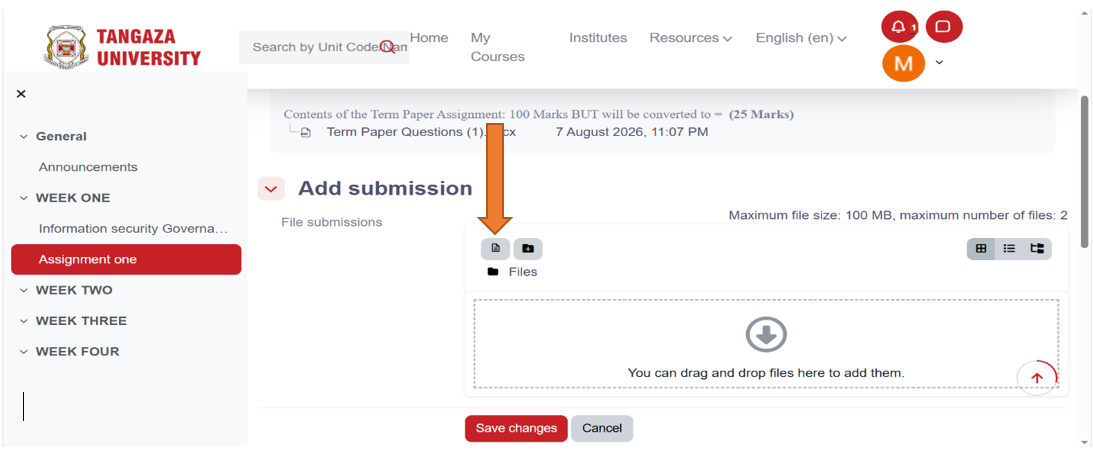
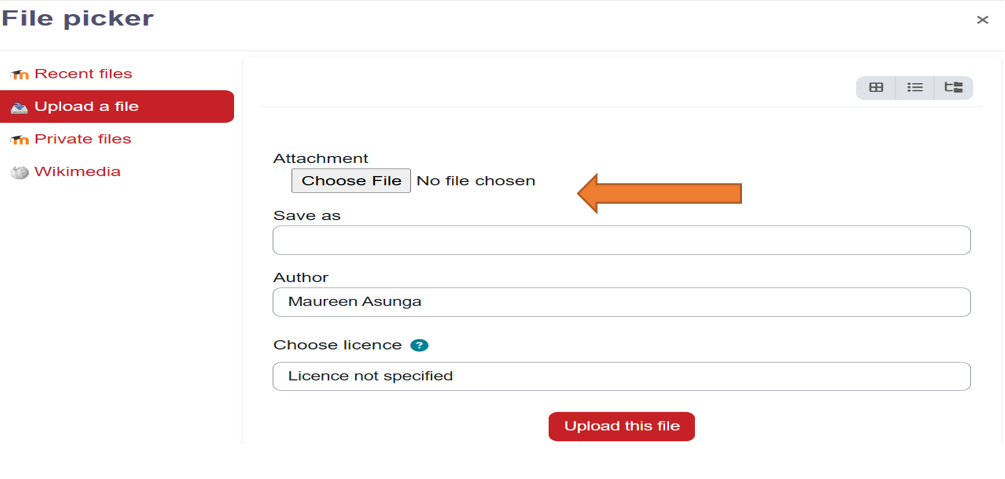
- In the File submissions box, either drag your file straight into the box or click the Add file icon to open the file picker.

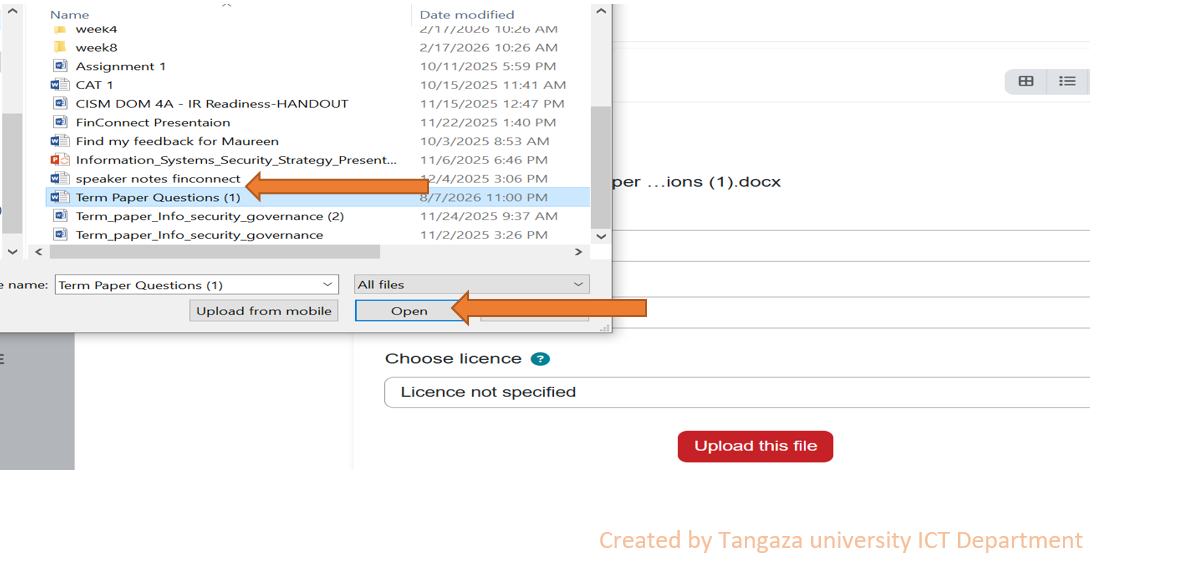
- In the file picker, choose Upload a file, then click Choose File.

- Locate the file on your computer and click Open.

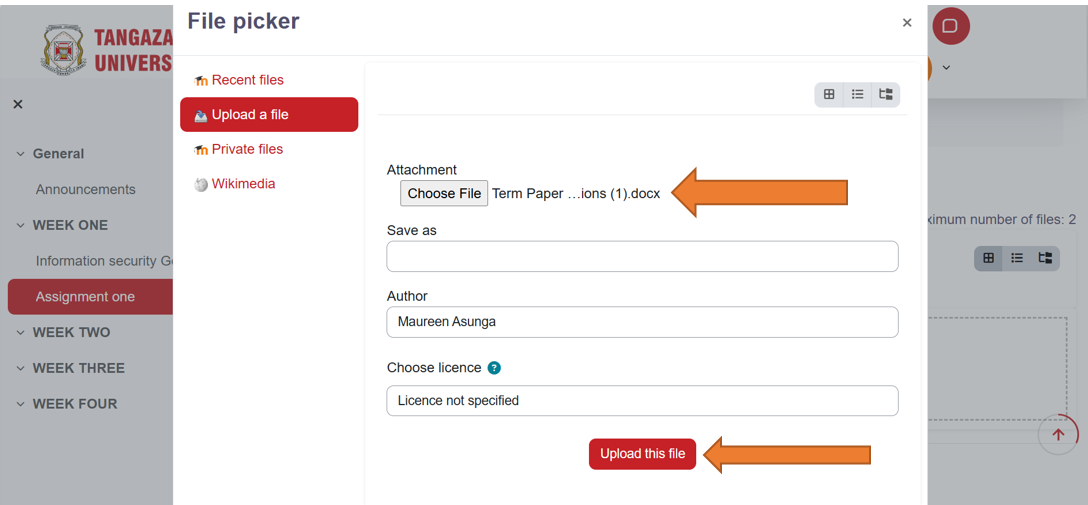
- Back in the picker, confirm that your file name now appears, then click Upload this file.

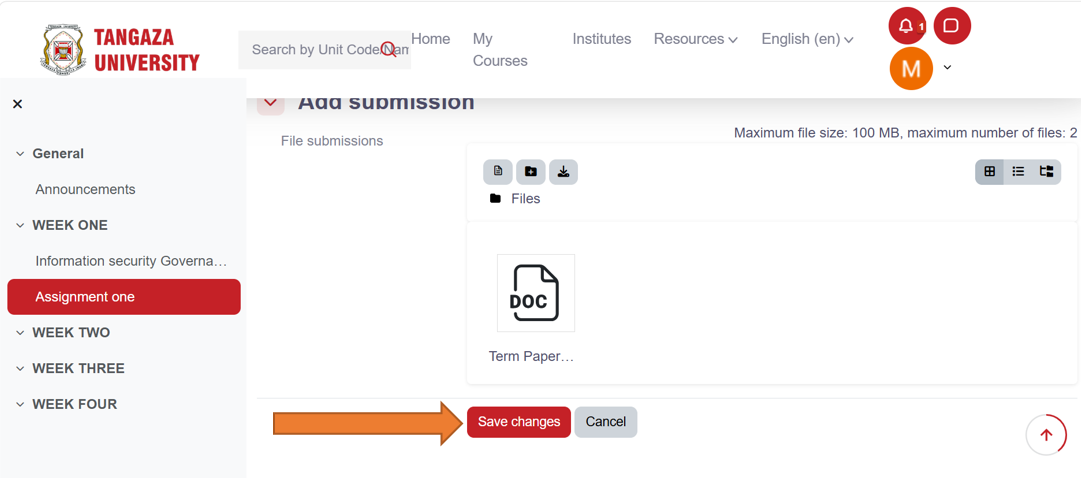
- Click Save changes.

- Check your submission status. If it reads Draft (not submitted), click Submit assignment and confirm. Your work is only handed in once the status shows Submitted for grading.
Submit before the due date. A submission left as Draft (not submitted) has not reached your lecturer, always check that the status shows Submitted for grading.
Navigating the Library Catalogue – OPAC
✓ Search for books and other library resources.
✓ Check the availability and location of a resource.
✓ Log in to your library account to manage your loans.
Accessing and Using the Library Catalogue – OPAC
1. Access the OPAC
- Open the Library OPAC using a computer or mobile device.
- Access it through the Library website: https://tangaza.ac.ke/library/
- Or directly by typing: https://opac.tangaza.ac.ke/
2. Search for a Resource
- Enter a title, author, subject or keyword in the search box at the top of the page.
- Click on the Search icon.
- Use the filters provided such as Author, Subject, Item Type, holding library or Publication Date to refine and narrow your results.
Note: You do not need to log in to search for library resources.
3. Check the Book, Journal or Other Item Details
From the search results, click on the title in red to view:
4. Locate the Book, Journal, etc.
- For a book: write down the call number and library location, then use these details to find the item on the shelves.
- For a journal: write down the title, series, and description, then use these details to find the item on the shelves.
Note: The icons next to the search results indicate the type of resource, for example: 📖 Book | 📰 Journal | 💻 E-book | 📄 Thesis
5. Log in to Your Library Account
Log in to your library account through the OPAC to:
- View borrowed items
- Check due dates
- Renew items
- View holds / reservations
- Check library fines
- Manage your account
Important: Change your temporary password after your first login and keep your login details private.
Navigating the E-Library – MyLOFT
✓ Set a new password during your first login.
✓ Install the MyLOFT browser extension on a computer.
✓ Download the MyLOFT mobile app.
✓ Open and search databases, then download or save results.
1. Log in to MyLOFT for the First Time
A. For Accounts Created by the Library
- Open the MyLOFT sign-in page directly: app.myloft.xyz – or reach it through the Library website: https://tangaza.ac.ke/library/.
- Enter your TU-issued Gmail address.
- A password setup link will be sent to your TU Gmail account.
- Open the link in your email and create your MyLOFT password.
- Return to MyLOFT and log in using your TU Gmail address and new password.
B. To Create Your Own Account
If you do not have a MyLOFT account:
- Open the MyLOFT sign-in page directly: app.myloft.xyz – or reach it through the Library website: https://tangaza.ac.ke/library/.
- Click Sign Up.
- Enter your TU-issued Gmail address and the required details.
- Check the box to agree to the Terms of Use and Privacy Policy.
- Check your TU Gmail account inbox for the verification link.
- Return to MyLOFT and log in using your TU Gmail address and password.
For Computer Users
- Install the MyLOFT browser extension when prompted.
- Follow the on-screen instructions to complete the installation.
For Mobile Phone Users
- Download the MyLOFT mobile app from the Google Play Store or Apple App Store.
- Open the app and log in using your TU Gmail address and MyLOFT password.
2. Find E-Resources
- After logging in, go to E-Resources.
- Click on All Databases.
- Select your preferred database from the list, e.g. EBSCO, JSTOR, Emerald.
3. Search for Information
- In your preferred database, enter a title, author, subject, or keyword in the search box.
- Click Search to view the results.
- Use the available filters to narrow your search if necessary.
4. Access the Resource
- Click on the resource you need from the search results.
- MyLOFT provides access to the full text where it is available.
- For an e-book, select the book and navigate to the required chapter or section.
5. Save or Download
- You can save articles or other available content for later use.
- Download the PDF.
- Save the content in MyLOFT for offline reading and access it later through your Collections.
Need help? For assistance with MyLOFT or e-resources, contact: elibrary@tangaza.ac.ke
Navigating the Digital Repository
✓ Search for and open resources.
✓ Read or download available documents.
1. Access the Digital Repository
- Access the Digital Repository using a computer or mobile device.
- Access it through the Library website: https://tangaza.ac.ke/library/
- Or directly by typing: https://repository.tangaza.ac.ke/
2. Search for a Resource
- Enter a title, author, subject or keyword in the search box.
- Click Search.
- Use the available filters to narrow your results.
3. Browse the Collections
- Select Communities & Collections to browse resources by school or department.
4. Read or Download
- Click on the title of the resource you need.
- Click on the link under Files to access the full text.
- You can either read online or download the PDF document.
Library Services & E-Resources
Welcome to Library Services & E-Resources
In this guide you will find instructions for accessing the Library Catalogue (OPAC), the E-Library (MyLOFT), and the Digital Repository. Start with whichever resource you need right now – you can always come back for the others.
| 📚 Library Catalogue (OPAC) | 💻 E-Library (MyLOFT) | 🏛️ Digital Repository | ✉️ Check Plagiarism |
📚 Library Catalogue – OPAC
The Library Catalogue (OPAC) helps you find books, journals and other materials, and shows where they are and whether they are available, covering:
💻 E-Library – MyLOFT
MyLOFT (My Library on Fingertips) brings e-books, e-journals and databases together in one place, covering:
🏛️ Digital Repository
The Digital Repository gives you access to the University's own publications, covering: